We must understand what a film budget truly is-it is a prediction of the future of what you plan to spend on a film. The two ways to make a film budget is either with a spreadsheet (like Excel) or with film budgeting software. Sure, both have good and bad points, but honestly, the stuff you can do with a dedicated budgeting app blows a spreadsheet out of the water. Software has version history, file sharing and live collaboration, budget templates, automatic backups, and ensures the budget remains in the standard format expected by the entire film industry.
So, let’s understand how a budget is made and works.
The first thing is the most basic understanding of line item details. A “line item detail” is just one entry in the budget, like the cost for one position or thing, such as “the camera operator.” It lists how many days they’ll work and how much they get paid each day. Multiplying those two numbers gives you the total cost for that entry.
It will look something like this:
Camera Operator x 2 days x $600 per day = $1,200 total pay
The budget will contain multiple line item, that detail every single expense for the film—from positions and rental items to food, per diem, hotel rooms, and fuel purchases,etc… literally everything, so that you can plan for the entire film’s monetary spending.
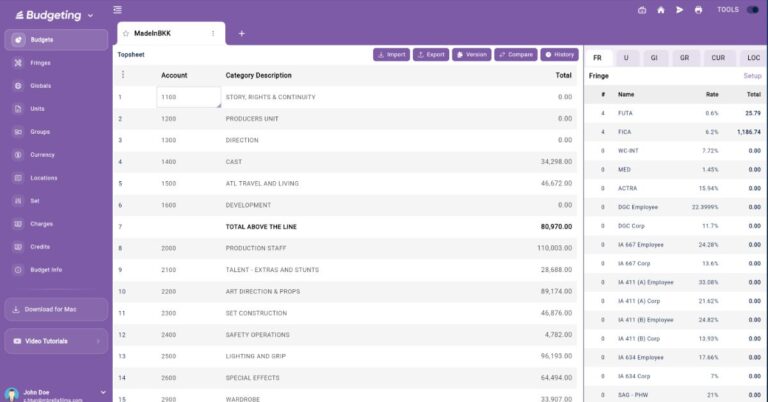
These line items are then categorized and grouped within the total budget on the front page. This front page is where you can see the total sum for each category and the total for all categories together as a whole.
Since you now understand how a line item works, you are already halfway there in understanding how film budgeting software fully works.
The next thing now is for you to understand all the other auxiliary calculations and category classifications that help to define your line items more precisely.
Here is the list of them:
- ATL (above the line) and BTL (below the line)
- Accounts and Categories
- Globals
- Units
- Fringes
- Groups
- Locations
- Sets
- Credits
- Currency
- Production Fee
- Top Sheet
What does ATL and BTL mean in a film budget?
First, we must break down what Below The Line (BTL) and Above The Line (ATL) actually mean in filmmaking. In the old studio system, budgets were typed on physical paper. Accountants literally drew a line across the page to separate costs. It is important to understand this history to know why the industry functions the way it does. It is all about risk and investment.
Above The Line (ATL) Positions
ATL roles are the project initiators and the creative backbone. These are the writers, directors, producers, and lead actors. They secure the financing, and their loss would typically be fatal to the project.
- Examples: Writers (who create the intellectual property), Directors, Producers, and Lead Actors.
Below The Line (BTL) Positions
The positions below the line are the crew and vendors. These are the people who execute the vision. They are the physical machinery of the film.
- Examples: Camera Operators, Gaffers, Grips, and other technical crew.
For example, a lead actor is ATL. A camera operator is BTL.
To provide some clarification, let’s talk about the Director of Photography, are they ATL or BTL?
People often think the DP is ATL because it is a highly creative role. We rely heavily on the DP for the film’s entire aesthetic. They paint with light. But technically, the DP is BTL. If a DP leaves, it brings tough vibes and disrupts the set, but the show can still go on. It is not a fatal blow like losing your star actor.
What are the Accounts and Categories of a film budget?
The next thing to understand are the Accounts and Categories of a film budget.
Once you have filled out a line item, then you fill out another, and another, and so on… You will do this within an “account”, for example, for CAMERA, you will make all the line item details for the camera rental, the lens rental, the camera, operator, the camera assistant-all the things that should be considered to be within the CAMERA account.
This account titled CAMERA now has the total amount of budget that will be spent on all things to do with the camera department.
Lets say all the line items within the camera account are a total of $4,000. That means also the account titled CAMERA also has the $4,000 value.
And just like the camera line items are within the CAMERA account, the CAMERA account is also within a category, and that category is titled “BELOW THE LINE – PRODUCTION”.
So that means the value of $4,000 also is within the category, meaning BELOW THE LINE – PRODUCTION also has a value of $4,000.
Here is a “birds-eye-view”.
(Category)
BELOW THE LINE – PRODUCTION: $4,000 total
(Account)
CAMERA: $4,000 total
(Line Item Details)
Camera Operator: $4,000 total for all items
Now, lets about the other accounts, what are they? A feature film can have thousands of individual expenses, so it must have many types of ACCOUNTS. Think of them as book chapters, laid out in a nice and organized order.
Here are a few and what makes up each account:
- Story & Rights (Acquiring the script and/or rights)
- Scenario & Writers (Fees for screenplay development and script revisions)
- Producers (Fees for producers)
- Direction (Fees for the director and creative)
- Cast (Salaries & fees for principal and supporting on-camera performers)
- Production Staff (Administrative support, production management, production coordinators, and office personnel)
- Art Department (Design and construction of sets and props)
- Camera Department (Personnel and equipment for capturing associated with cameras)
- Electric & Grip (Lighting equipment and crew, and camera rigging equipment and crew)
- Production Sound (On-set sound recording)
- Wardrobe & Makeup (Costume design, Makeup, and SFX Makeup)
- Locations (Site rentals, permits, and logistical site management)
- Post-Production Picture (Editorial) (Film assembly, picture edit, color grading, and final cutting)
- Visual Effects (Digital imagery or CGI created or enhanced in computers)
- Post-Production Sound (Sound design, foley, mixing, and final scoring)
What are globals for in a film budget?
Think of a Global like a “remote control” for your budget. Instead of walking up to every single television (line item) to change the channel, you press one button on the remote, and every TV in the house changes at once.
Instead of manually typing the amount of days into hundreds of different rows, you define these values in a central place only one time (the Globals page).
You create a master Global code to refer to. So lets give it the code name and value as below:
- Name: SH_DAYS (Shoot Days)
- Value: 10
Now when you go to your CAMERA line item details, you don’t type the number “10” for the amount of days, instead, you type the name of the Global we made SH_DAYS.
Lets set a line item as such for this example:
1 Camera Operator × $500/day × SH_DAYS(10) = $5,000
Now later on, you decide need to change the amount of days shooting from 10 to 11.
So you go back to the Global value, and change it:
- Name: SH_DAYS (Shoot Days)
- Value: 11
And now it changes on all the hundreds of line items that have the Code.
1 Camera Operator × $500/day × SH_DAYS(11) days = $5,500
It is reflected on this line item and also throughout all the other line items with the code SH_DAYS.
We never had to actually go into the line item and change the number of days, because we changed it at the global level from 10 to 11 and it changed all line items that were using the SH_DAYS global.
Now you may be asking why do I need to do this and how are Globals best used?
The power of Globals is for efficiency and “What If” scenarios:
- Scaling: If the Producers decide to cut the shoot from 25 days to 22 days, you simply change the {ShootDays} Global to “22” instead of line by line, which is extremely time consuming.
- Accuracy: It eliminates human error. You don’t have to worry about forgetting to update the “Truck Rental” count when you change the “Shoot Weeks” count.
- Consistency: It ensures that every department is working off the same schedule assumptions. If the Global says 6 weeks of Post-Production, every editor and sound mixer’s budget is locked to that same 6-week duration.
Some other common Globals are:
- Shoot Weeks
- Prep Weeks.
- Currency Rates.
- Days
What are units for in a film budget?
While a Global tells you how long you are shooting, a Unit defines the type of measurement being used for a specific cost. At the most basic level, money is traded for time or things. Units tell us exactly how a line item is measured for that trade.
In a film budget, you don’t just have “money.” You have costs that are triggered by time, quantity, or flat fees. A Unit is the label that tells the budgeting software how to multiply the rate.
Common Units include:
- Day: For daily crew (Camera Op, Grips).
- Week: For rentals or department heads.
- Flat: For one-time fees (a script purchase).
- Each/Allow: For specific items (a single prop or a kit rental).
Let’s look at our Camera Operator. To get an accurate total, we have to define how they are being paid.
The Scenario: You hire one Camera Operator for a shoot. Their rate is $500.
| Description | Count | Unit | Rate | Total |
| Camera Operator | 1 | Day | $500 | $500 |
Now, let’s look at our Camera Operator again. To actually make the math work, we need to indicate their $500 rate is applied per day.
1 Camera Operator × $500 x 10 days = $5,000
By setting the Unit to Day, you are telling the budget: “Multiply the count of 1 by the rate of $500 for every day worked.”
If they work 5 days, the math becomes:
1 (Camera Operator) × 5 (Days) × $500 (Rate) = $2,500
The reason we use Units is that a single account often uses multiple different types of measurements at the same time. If you didn’t have Units, your math would quickly fall apart.
Look at how the Units change depending on what you are “buying” for the Camera Department:
- Camera Labor (days)
- Camera Equipment (weeks)
- Expendables (per item)
So what about other types of units?
Aside from daily, hourly, and weekly, we also have “allow” and “flat”.
“Allow” means allowance. It is a bucket of money set aside for a specific cost when the exact price is still unknown. It is a safety net.
“Flat” means a flat rate. It is a fixed, negotiated fee for a job, regardless of how many hours or days it takes. It is a strict bound to that flat agreed to cost.What are fringes in a film budget?
A Fringe is any cost associated with hiring a person that is paid above and beyond their actual salary. These are not paid directly to the crew member; instead, they are paid to the government, or to their unions, or to insurance companies, etc.
When you see a line item for a Camera Operator, you might think the only cost is their $500/day rate. However, as an employer, the production company is legally and contractually obligated to pay extra taxes and benefits depending on the country or tax jurisdiction that they are operating under.
Some Common Fringes could be:
- Payroll Taxes: Social Security, Medicare, and Unemployment (FICA, FUI, SUI).
- Union Benefits: Pension, Health, and Welfare (PH&W) payments required by guilds like IATSE.
- Workers’ Comp: Insurance in case the crew member gets hurt on the job.
- Holiday/Vacation Pay: Additional percentages added to union wages.
Now let’s go back to our Camera Operator who is earning $500 for one day of work. To the Operator, their “Rate” is $500. But to the Producer, the “Total Cost” is higher than that!
- Salary: $500 (1 Day × $500)
- Payroll Taxes (e.g., 15%): $75
- Union Pension & Health (e.g., 20%): $100
- Workers’ Comp (e.g., 4%): $20
The line item might show $500, but because of the Fringes, the production is actually spending $695 to for the Camera Operator in total.
A simple way to look at this is:
- the Rate is what the crew member puts in their pocket.
- the Fringe is what the production pays to keep the lights on and the government happy.
By including Fringes in your Camera Operator’s cost, your budget reflects the actual cost, not just the “sticker price” of the labor.
What are groups used for in a film budget?
A Group in film budgeting software is a tool used to categorize and filter your budget based on some other type of intent or qualification, rather than just the department name. You can “turn on” or “turn off” these groups to see how they affect the total cost of the movie.
Some Common Groups would be:
- Tax Incentives: Items that qualify for a government tax rebate or credit.
- Main Unit vs. 2nd Unit: Separating the primary crew from the stunt unit, or b-roll crew.
- Labor vs. Equipment: Distinguishing what you pay people from what you spend on “gear.”
- Fringeable vs. Non-Fringeable: Sorting items that require extra taxes from those that don’t.
So, let’s look back again at our Camera Operator. While they belong in the “CAMERA” account, the Producer might need to track their costs for a film tax rebate.
If you are shooting in a state that offers a 30% refund on all money spent on “Local Labor.” You need to prove exactly what you paid to those people who qualify for the local labor in that state.
So, lets make a group for this. You define it in the Group Master Window. This is simple, no math or formulas this time, like we did for Globals- you only create a label and assign it a color.
For example:
Name: REBATE
Description: Qualifying Local Labor Spend
Color Code: Green
Since we have already created the REBATE group, we can now tag all of the line items we need to be included with the REBATE group.
So lets assume you have 2 camera operators, one that is in-state(A Cam Local – qualifies for the rebate) and one that is out-of-state(B Cam Local – DOES NOT qualify for the rebate).
On the line item for Camera Operator A (Local): You tag their salary with the “REBATE” Group.
But, on the line item for Camera Operator B (Local): You leave their Group column blank since they don’t qualify for the rebate.
Even though both camera operators are in the same department doing the same job, you can now “filter” your budget and generate a report showing only the “REBATE” Group, proving to the government exactly how much you spent on local hires.
And remember, you can use Groups to slice and dice your budget in many different ways—whether that means isolating specific costs to prove they qualify for a rebate, or filtering your line items to show exactly what belongs to a specific production phase.
What are locations in a film budget?
In film budgeting software, a “Location” is a label you attach to a line item to dictate geographic spending. If your film is shooting in multiple cities or countries, you don’t want to mix the money all into one pot.
Unlike a Group, which tracks why you are spending money (like someone as local or out-of-state), a Location strictly tracks where the money is being spent. This is essential because film budgets can be heavily audited for tax incentives and rebates as well as by the studio or financier of the film.
When you are creating these tags, you will have a code you create that correlates with a specific location.
Like this:
- LA (Los Angeles)
- ATL (Atlanta)
- LON (London)
Let’s look back at our Camera Operator who is working on our 10-day shoot. But now, the schedule dictates that the first 4 days are shot in Los Angeles on location, and the remaining 6 days are shot in Atlanta on a sound stage or studio.
So, lets set up these locations in the location master area.
Name: Los Angeles
Description: On Location
Code: LA
and
Name: Atlanta
Description: Studio Phase
Code: ATL
Now that the locations are setup, lets go back to the Camera Operator line item and instead of putting all 10 days on a single line, you split the Camera Operator into two lines, and then assign a Location tag to each.
Here is what it should look like:
| Location Tag | Description | Count | Unit | Rate | Total |
| [LA] | Camera Operator A | 1 | 4 Days | $500 | $2,000 |
| [ATL] | Camera Operator B | 1 | 6 Days | $500 | $3,000 |
By tagging the line items individually, the software can now generate a specific “Atlanta Report” that pulls only the $3,000 spent in that city, hiding the LA costs entirely.
Both lines live right next to each other in the Camera Department account, and combined they still account for 10 days, and the total is still $5,000. However, the software now knows exactly where every dollar of that salary is being earned.
Assigning Locations is very crucial for productions that travel, primarily because of taxes, currencies, and reporting:
Here are some examples:
- Logistical Clarity: It helps producers see the true cost of traveling. If they ask, “What is our total spend for the Atlanta portion of the shoot?”, the Location tags allow the accountant to instantly isolate the Atlanta hotel costs, the Atlanta camera operator days, and the Atlanta catering, hiding the rest of the movie. Location tags in film budgeting software offer crucial financial clarity:
- Tax Incentives: Easily generate “Location Reports” to prove state-specific spending (e.g., ATL tag) for tax rebates.
- Multiple Currencies: Link locations, like London and Los Angeles, to their specific currencies to automatically calculate costs in British Pounds or US Dollars.
- Other location specific costs: Isolate total spend for any portion of the shoot (e.g., Atlanta hotelc costs, London crew costs, or Los Angeles catering costs) for just a better overall cost analysis.
Some producers love asking for highly specific budget breakdowns, so that they can compare costs many different ways and ultimately find ways to save money. Using these location tags to slice and dice the numbers is a way to do just that—without pulling your hair out in the process.
What are sets for in a film budget?
In film budgeting, a “Set” is a label you attach(tag) to a line item to track costs tied to a specific scene or environment of the script. This is especially vital for something like Art, Construction, and Lighting departments.
If you were setting up tags for the major builds on your soundstage days, they might be something like “The Bank Vault”, “Jack’s Apartment”, or the “Spaceship Bridge”.
Let’s assume your Production Designer needs to hire 10 extra carpenters to build two of these sets on the soundstage, each working for a 10-day build schedule.
So first, lets set up the Sets master area and assign their codes, just like we did for locations.
Name: Bank Vault
Description: Main Heist Sequence
Code: VAULT
and
Name: Hero’s Apartment
Description: Day/Night Interiors
Code: APT
Now, instead of putting all 10 carpenters on a single line item, you split the carpenters into two separate lines and assign a Set tag to each to track exactly what set they are building.
| Set Tag | Description | Count | Unit | Rate | Total |
| [VAULT] | Carpenter (Vault Build) | 4 | 10 Days | $400 | $16,000 |
| [APT] | Carpenter (Apartment Build) | 6 | 10 Days | $400 | $24,000 |
The combined total still equals your 10 carpenters ($40,000 in total labor), but now you can track the spending for each set (script environment) separately. The software knows exactly how much of that carpentry labor is dedicated strictly to the vault.
In the end, think of Set tags as being able to view your budget in a completely modular way. When financiers want to scrutinize the cost of specific scenarios, sets is another way you can non-destructively extract that exact data with a single click and eliminate hours of manual work.
What are credits in a film budget?
In film budgeting software, a “Credit” (often referring to Tax Credits, Incentives, or Rebates) is a calculation that applies a negative value against your total expenses, think of it like “cashback rewards” for your budget.
Governments around the world offer incentives to attract film productions to their area.
So this means that credits are like a financial tool used to calculate money the production expects to get refunded by the government, effectively lowering the true final cost of the film.
In short, the Credits tool automatically calculates the difference between your Gross Budget (the total amount of cash you have to spend to make the movie) and your Net Budget (the actual cost of the movie after the government writes you a refund check).
Let’s look again at our Camera Operators who are working for our 10-day shoot at $500 a day, we split these cam ops earlier into two lines, one line for Los Angeles for 4 days and one line for Atlanta for 6 days.
In Atlanta, you get a 20% tax rebate (credit) on all local labor, so we need to see what the savings for this will be for the one camera operator working in Atlanta only as a local hire.
We don’t blindly include the discount into the line item of the camera operator and all the other lines that will qualify for the rebate. Instead, we need to assign (tag) the credit to each the particular line item that is applicable, in this case, the camera operator in Atlanta.
So let’s first set up the code for the 20% Atlanta rebate in the Credit Master area.
It should look like this:
- Name: Georgia State Rebate
- Calculation: 30% of Qualified Spend
- Code: GA_TAX
Now lets tag the line items that qualify(camera operator). In the line item, you will choose the credit column and apply the code “GA_TAX”
| Credit Tag | Description | Gross Cost | Credit Applied | The Math | Net Cost |
| [GA_TAX] | Camera Operator A (Local) | $5,000 | 30% GA Rebate | $5,000 x 30% = -$1,500 | $3,500 |
| (Blank) | Camera Operator B (Out-of-Town) | $5,000 | (None) | (None) | $5,000 |
Instead of just showing the upfront cost, the software’s Credit tool splits the financial reality into two columns: Gross (the cash you need today) and Net (the final cost after the rebate).
The budgeting software also tells the accounting team they need to have exactly $10,000 in the bank to pay both operators (the Gross), because the rebate is issued AFTER the film is made, that is when they give the rebate back to the producers.
But this tells the producers ultimately what the final spend in the end after all of the credits are settled back.
Tracking Credits is often the single most important factor in deciding if a movie actually gets made, this is actually a way to forecast for the producers and studio:
It helps with knowing what amount of money is needed in order to get through the shoot and post.
It helps to get a greenlight from a studio, because they understand in the end what the true spend of this investment is.
Credits are also needed to prove to a bank or lender, who lends against the tax credits or rebates, to cashflow a film’s production.
How do you change currency in a film budget?
In film budgeting, you don’t just guess the conversionIn rate between currencies. You must first establish a Base Currency (usually the currency of the investors or studio). We will use USD for ours.
If you have any international shooting locations, you need to assign a foreign currency and an exchange rate. Let’s choose London for our foreign location, so that means our foreign currency will be British Pounds (GBP).
So lets create the base currency and the foreign currency exchange rate in our Currency Master area.
It should look like this:
Base currency: USD
And
Foreign Currency Name: British Pound
Code: GBP
Symbol: £
Exchange Rate: 1.25 (meaning £1 = $1.25 USD)
Now, instead of manually doing the math on each line item that is for London, you simply designate the GBP currency code (tag) to their line item.
Let’s say we are now moving the LA portion of the shoot to Londo. So our Camera Operator who is working for our 4-day LA shoot would be replaced by a camera operator in London now, and he would be paid in British pounds instead of US Dollars.
You agree to pay the London camera operator £400 per day. You assign the GBP Currency tag to their line item.
| Description | Count | Unit | Rate (Foreign) | Currency | Exchange Rate | Total (Base) |
| Camera Operator | 1 | 4 Days | £400 | GBP | 1.25 | $2,000 |
Since the currency exchange rate is at 1.25, that means we are still paying the equivalent of $500 per day.
The film budgeting software tracks both numbers simultaneously. It knows you need to pay exactly £1,600 (4 days x £400) to the UK payroll company, but then it also translates that cost on your budget page so the American Producers see a clear, understandable $2,000 USD.
The Currency tool only acts as a real-time exchange rate if you update it as the market fluctuates. As a producer, you must keep a close eye on the rates and when they change. Try it out with our film budgeting software, Periscope Film Budgeting.
Where do I put the production fee in a film budget?
The Production Fee is the “how your company makes money fee” of your budget. It is the money the physical production company charges the studio or financiers for the actual work of executing the movie.
While the budget covers the direct costs of making the film (paying the crew, renting the cameras, building the sets), the production service company overseeing the entire circus needs to keep its own lights on. The Production Fee covers the production company’s corporate expenses and profit.
Instead of hiding this profit inside individual line items, it is openly declared as a distinct calculation based on the entire budget total, and usually at the very end of the budget on the “Top Sheet” in the Charges section.
Now, how you calculate this fee depends entirely on the contract you have with the financiers, producers, or whoever is hiring your production company:
- Cost Plus (Percentage): The financier agrees to pay the actual cost of the film plus a percentage (usually 10% to 15%) as the fee. If the movie goes over budget, the fee technically goes up (though studios usually put strict controls on this).
- Flat Fee: A pre-negotiated, locked amount. No matter if the movie costs $1 Million or $1.5 Million to make, the production company gets exactly $150,000, for an example.
- Capped Fee: A hybrid of the two. The company gets a percentage (like 10%), but only up to a certain maximum amount, protecting the financier from paying a massive fee if the production goes wildly over budget.
You don’t add the Production Fee directly to individual line items. For example, the Camera Operator’s rate at $2,000 USD remains exactly as it was, with no 10% fee attached to that specific row.
The software instead looks at the entire ‘BELOW THE LINE – PRODUCTION’ category as one giant subtotal and applies the fee to that whole amount. And it is ultimately displayed on the Top Sheet.
Your top should look like this:
| Category | Cost |
| Total Below-The-Line (Includes Camera Operator) | $1,000,000 |
| Production Fee (10% of Below-The-Line) | $100,000 |
| Grand Total | $1,100,000 |
This means, ultimately the Camera Operator still only gets their $2,000. But the financier pays $2,200 for that operator’s time—$2,000 to the crew member, and $200(10%) to the production company for the effort of hiring and managing them.
And because it applies to the whole movie and not a single line item, you calculate it differently than a Unit or a Fringe, it is calculated across all BTL totals.
The Production Fee is always displayed on the Top Sheet, typically at the very bottom, immediately following the budget subtotals and just above the Grand Total.
How do I read the top sheet in a film budget?
Now let’s get into the very last part of this little master class of film budgeting.
What is the Top Sheet? And how do I read it?
The Top Sheet is the financial overview of your film budget.
It is the very first page of any professional film budget—and realistically, it is the only page most studio executives and financiers will ever read.
Quick Tip: Make sure to export a PDF of your budget for producers and financiers. DO NOT send them an Excel file or any other type of proprietary software file. Make it easy for them to view the budget on any device with a simple PDF.
The Top Sheet is a high-level executive summary. It strips away the thousands of micro-details hidden deep inside the budget—like your Camera Operator’s daily rate or the specific cost of lumber for the Bank Vault set—and rolls everything up into a clean, macro-level view of the entire budget.
Instead of showing how you are spending the money row by row, it shows where the money is going by category and account.
The industry standard Top Sheet is:
- ABOVE THE LINE (ATL): This includes Story rights, Writers, Producers, Director, and Lead Cast. A lot of these are typically negotiated flat fees, done by the film’s producers, and are locked in before the line producer gets to make a budget.
- BELOW THE LINE – PRODUCTION (BTL): The Actual “Physical” shoot, AKA on-set. This is typically the largest part of any film budget. Your Camera Operator is included here, as well as the Construction Crew, locations, other technical crew, production staff, equipment rentals, and all the other pieces we talked about previously being in the BTL Production section of the budget.
- BELOW THE LINE – POST-PRODUCTION (BTL): Once production wraps, the costs move here to cover film editing, visual effects (like the CGI version of your Bank Vault), music scoring, and sound mixing.
- BELOW THE LINE – OTHER (BTL): This is for administrative costs like production insurance, legal fees, and office expenses.
Below these four, there is a whole other section, where we see the totals and final budget amounts.
- Grand Subtotal: This is the combined total of the ATL and BTL categories. It represents the “raw” physical cost of making the film.
- Charges: We talked about in the last section. This dedicated section is where your Production Fee is seen. It is isolated from all other categories and accounts, and calculates its percentage automatically based on the subtotal above it.
- Grand Total: The final number. This is the bottom line that the producer or financier uses to greenlight the film.
Why the Top Sheet is Your Most Powerful Tool? Financiers do not want to flip through a 100-page document analyzing the price of screws, catering, and daily rates. They want to see the Top Sheet to instantly understand the financial structure and viability of the film.
In summary, it takes all of your meticulously tagged Locations, Sets, Currencies, and Fringes, and translates that massive pile of data into a single, easy to read PDF that proves your production is organized, transparent, and ready to be funded.
What film budgeting software should I buy?
If you feel this guide has provided value and helped you to easily understand all the parts of a film budget work and come together, I would really appreciate it if you gave our software a try, Periscope Film Budgeting.
We regularly put in the time to break down film budgeting concepts and workflows because we genuinely want to help you understand how to better produce and manage productions.
We built it specifically to handle everything we coveredt here—from Locations and Fringes to the Top Sheet.
It’s powerful, fast, and affordable.
Plus, your first month is completely free, so you can try it out without any worries at all.